Visa Document Upload Errors: The Most Common Fixes

Visa applications are increasingly digital, but one part still trips up a huge number of travelers: document uploads. A single blurry passport scan or the wrong file type can stall an electronic visa (eVisa) or ETA application, trigger a “rejected document” notice, or force you to start over.
This guide breaks down the most common visa document upload errors (what they actually mean), plus practical fixes you can apply in minutes.
Why visa document uploads fail (even when your documents are “correct”)
Most upload failures are not about eligibility. They are about how the document is captured and packaged for an online system.
Visa portals and visa management platforms typically run automated checks before a human ever reviews your application. These checks can flag:
- File requirements (format, size, encryption, page count)
- Image quality (blur, glare, shadows, low resolution)
- Completeness (missing pages, cropped MRZ, partial stamps)
- Consistency (details do not match what you typed)
The good news is that most upload errors are mechanical and fixable without changing the underlying document.
Fast triage: 60-second checklist before you re-upload
Before you redo everything, confirm these basics:
- You are uploading the right document type for that field (passport bio page vs full passport, photo vs selfie, itinerary vs boarding pass).
- The file is not password-protected and is not inside a zipped folder.
- The file is within the size limit (many portals cap uploads at a few MB per file).
- The document is readable at 100% zoom, including numbers, expiration dates, and names.
- The MRZ (the two lines of characters at the bottom of many passports) is visible if you are uploading the passport bio page.
If you are still getting errors, use the fixes below.
The most common visa document upload errors (and how to fix each)
The exact wording varies by country and platform, but these are the issues that show up most often.
1) “Unsupported file type” (or “File format not allowed”)
What it usually means: The portal accepts only specific formats (commonly JPG/JPEG, PNG, or PDF), and you uploaded HEIC, WEBP, DOCX, or a scanned file embedded in a note app export.
Fixes that work:
- If you used an iPhone and your scan saved as HEIC, export or convert to JPG.
- If the portal wants PDF but you have photos, combine images into a single PDF using your phone’s print-to-PDF option or a trusted scanner app.
- If the portal wants JPG/PNG, do not upload a multi-page PDF. Export each page as a separate image.
Prevention tip: When scanning on mobile, choose a scan mode that lets you select output format before saving.
2) “File too large” (or upload fails with no clear message)
What it usually means: Your image is high resolution, multi-page, or includes unnecessary color data. Some portals also time out on slow connections when files are large.
Fixes that work:
- Re-scan in color only if required. Otherwise, use grayscale.
- Compress the image or PDF and re-upload.
- If you must upload multiple pages, split one large PDF into smaller PDFs (as long as the portal allows multiple uploads).
Rule of thumb: If the file is bigger than what you would email comfortably on mobile, it is probably too large for at least some government portals.
3) “Blurry image” or “Document unreadable”
What it usually means: The text fails automated readability checks, often due to motion blur, poor focus, or aggressive compression.
Fixes that work:
- Re-take the photo in bright, indirect light (daylight near a window works well).
- Tap-to-focus on the text area, not on the table surface.
- Place the document flat and stabilize your hands, or use a scanning app that auto-captures when stable.
- Avoid screenshots of photos. Screenshots often reduce clarity.
Important: If the portal is trying to read your passport details automatically, even mild blur can cause failure.
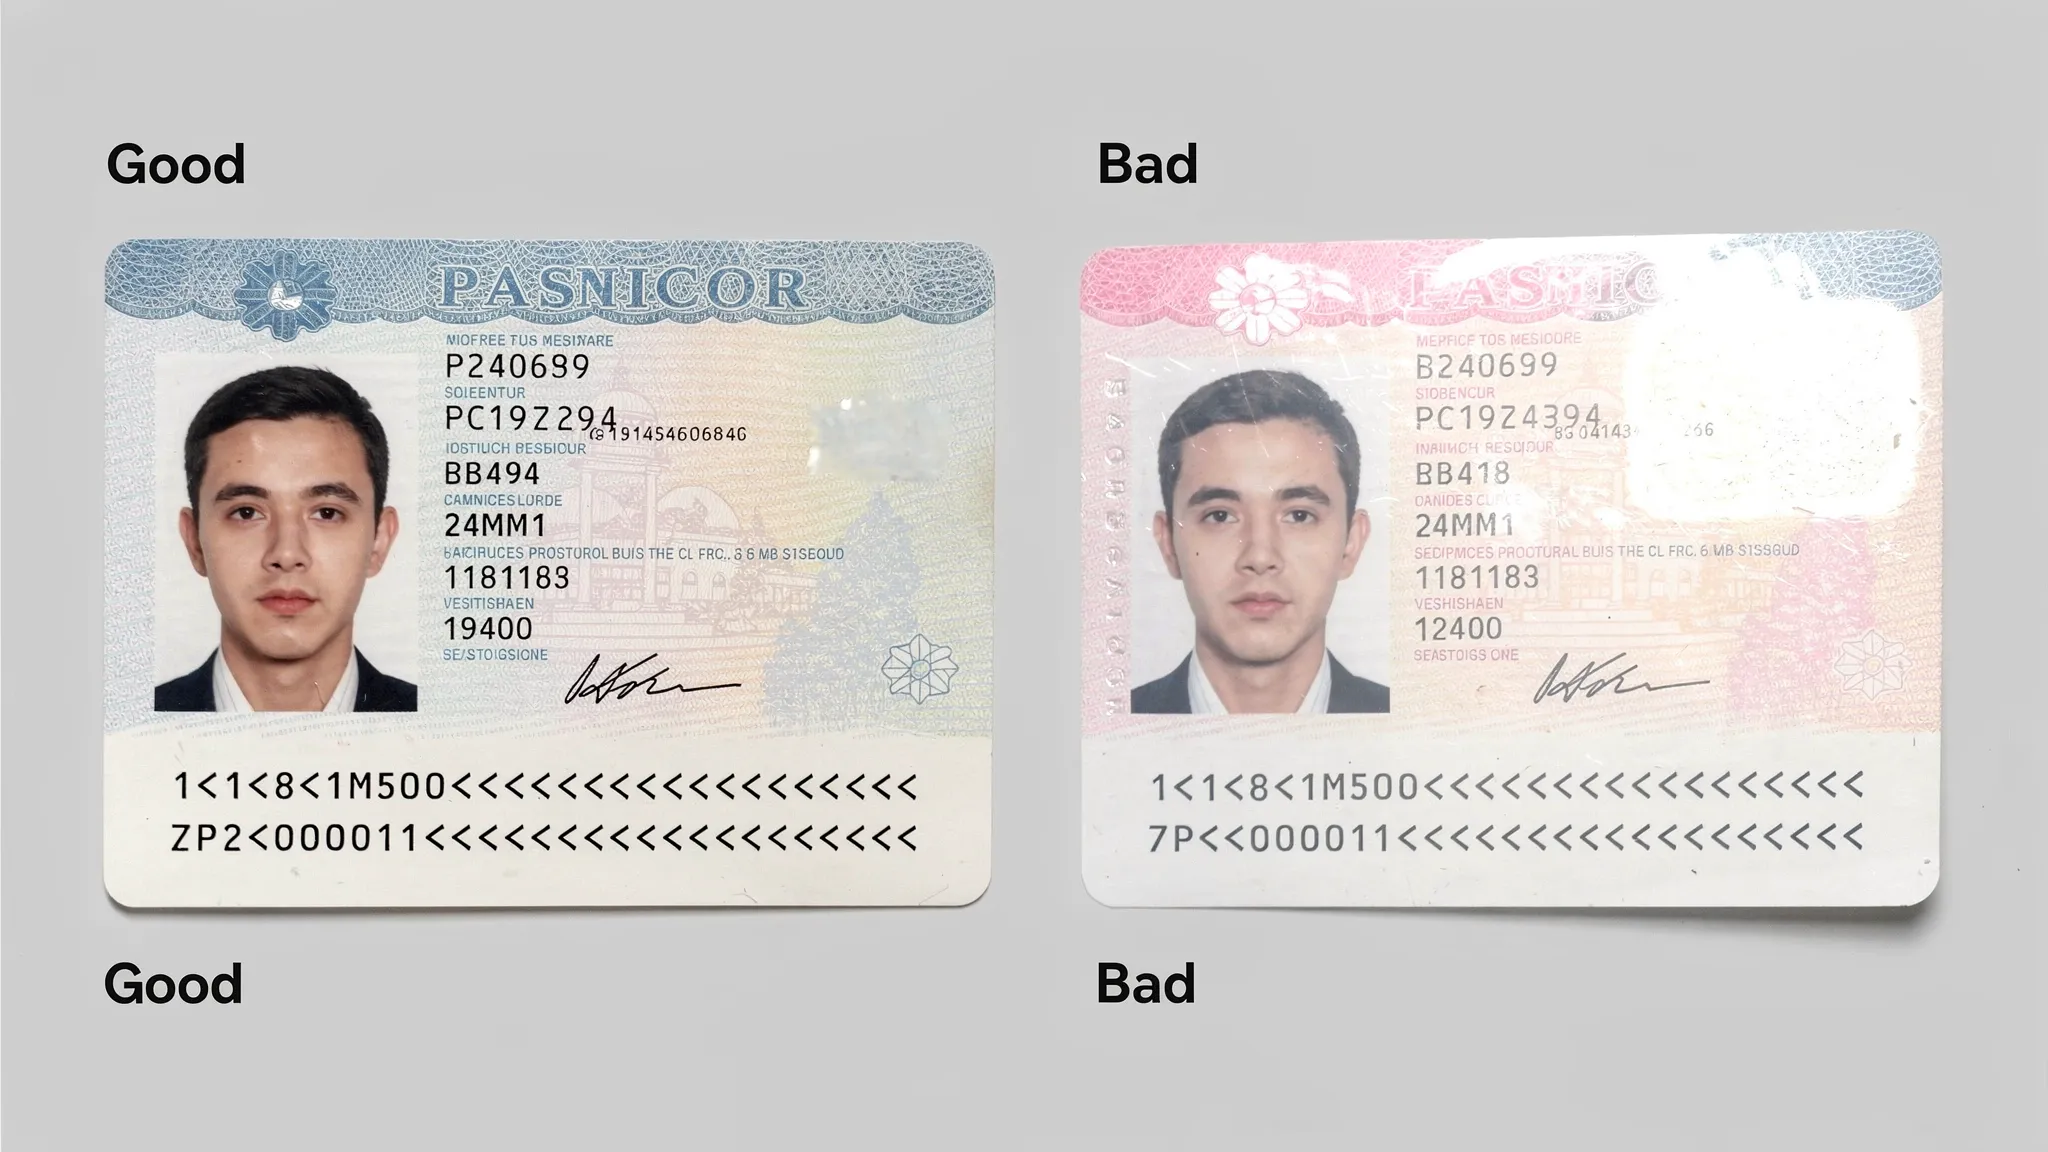
4) “Glare detected” / “Shadows on document”
What it usually means: Overhead lighting reflects off laminated passports or glossy paper. Shadows can hide characters and trigger quality rejection.
Fixes that work:
- Turn off flash.
- Rotate the document slightly to eliminate reflections.
- Use two light sources from the sides (or daylight) instead of a single overhead lamp.
- Avoid photographing on reflective surfaces like glass tables.
5) “Document is cropped” (missing edges, missing MRZ, missing corners)
What it usually means: The scanner auto-cropped too aggressively, or you zoomed in and cut off key zones (often the MRZ).
Fixes that work:
- Re-scan with a small margin around all edges.
- If using an auto-crop tool, manually adjust the crop to include the full page.
- Do not cover corners with your fingers, some systems reject images with occlusions.
6) “Password-protected” / “Encrypted PDF” / “Cannot open file”
What it usually means: Many people upload PDFs exported from a corporate system or a bank portal that adds encryption.
Fixes that work:
- Re-export without a password.
- Print the PDF to a new PDF (this often removes encryption).
- If you used a document vault tool, download a “standard PDF” version rather than a protected copy.
7) “Invalid photo” (visa photo rejected)
What it usually means: Your photo fails basic rules, such as background, lighting, head position, or it looks edited.
Fixes that work:
- Use a plain, evenly lit background (often white or off-white).
- No heavy filters, no beauty mode, no background removal artifacts.
- Keep the face centered and avoid harsh shadows.
- Follow the destination’s required dimensions and file size.
Note: Photo standards vary by country and by document type (eVisa vs ETA vs residence permit). When in doubt, follow the exact instructions for that application, not a generic “passport photo” template.
8) “Wrong document type” (uploaded the right info in the wrong place)
What it usually means: You uploaded a correct document, but it does not match what the field expects (for example, uploading a hotel confirmation to a “flight itinerary” field).
Fixes that work:
- Re-check the field label and any sample image.
- If the portal provides examples (like “upload passport bio page”), match them literally.
- If you are applying for multiple travelers, confirm you did not mix documents between passengers.
9) “Document expired” or “Passport validity requirement not met”
What it usually means: The system detected an expiration date that violates the destination’s minimum validity rule (commonly 3 or 6 months beyond arrival).
Fixes that work:
- Confirm your travel dates are correct (a wrong year can make a valid passport look invalid).
- If the passport is genuinely too close to expiry, renew the passport first, then re-apply.
Practical reminder: If you renew your passport after applying, many destinations require you to reapply or transfer the authorization.
10) “Upload succeeded” but the portal later says “Missing document”
What it usually means: The upload did not attach correctly to the application, or you uploaded but did not click the final “Save/Next/Submit” step.
Fixes that work:
- After uploading, look for a thumbnail preview or filename confirmation.
- Refresh the page and confirm the file is still attached.
- Avoid switching devices mid-application unless the portal supports it.
- If you are on mobile, try a desktop browser for the final submission step.
Quick reference table: error message to fix mapping
| What you see on the portal | What’s actually wrong | Fix to try first |
|---|---|---|
| Unsupported file type | Format not accepted (HEIC, WEBP, DOCX) | Convert to JPG or PDF per portal rules |
| File too large | Size cap or timeout | Compress, rescan smaller, split PDF |
| Blurry / unreadable | Focus, motion blur, low clarity | Rescan with better light, stabilize, avoid screenshots |
| Glare / shadows | Reflections hide text | Turn off flash, change angle, use daylight |
| Cropped / MRZ missing | Key zones cut off | Rescan with margins and full MRZ |
| Encrypted / cannot open | Password-protected PDF | Re-export or print-to-PDF to remove protection |
| Invalid photo | Background, dimensions, editing | Retake in plain light, follow destination specs |
| Missing document (after upload) | File not attached at submission | Confirm preview, refresh, reattach, submit |
Special case: proof of accommodation uploads (hotel, invitation, or lease)
Accommodation documents are commonly rejected because they are screenshots, incomplete PDFs, or do not show the traveler’s name and dates.
If you are staying longer term and uploading a lease or housing confirmation, make sure the file clearly shows:
- Address
- Dates of stay
- Your name (or your host’s name, plus an invitation letter if required)
For travelers planning extended stays, it can also help to use a service that supports the relocation end-to-end, including housing and local setup. For example, Movely’s long-term rentals and home services can be useful when you need stable accommodation arrangements for a longer trip.
For travel teams: how to reduce upload errors at scale
If you are an OTA, airline, TMC, or tour operator, upload errors are not just annoying, they create real operational cost (tickets, chats, rework) and lost conversion.
A few high-impact improvements usually cut the majority of document-related tickets:
Make requirements visible before the upload step
Show accepted formats, max file size, and a one-line quality rule (“no glare, show all corners”) directly under the upload button. Do not hide it behind a tooltip.
Offer “capture from camera” and “upload from device”
Many travelers have the document in their photo roll, not in their files app. Supporting both flows reduces abandonment.
Add real examples (not generic icons)
A thumbnail showing “correct passport page with MRZ visible” prevents guesswork, especially on mobile.
Use guided, embedded visa journeys
Platforms like SimpleVisa are designed to help travel businesses guide customers through visa requirements and applications (via API integrations, white-label apps, or data services), reducing back-and-forth and helping you turn compliance into ancillary revenue.
If you want a traveler-friendly prep step that reduces upload mistakes, you can also point customers to SimpleVisa’s resources like the online visa application checklist and the guide on applying safely online.
Frequently Asked Questions
What is the most common cause of visa document upload errors? Poor scan quality (blur, glare, cropped edges) and incorrect file formats are the most common causes, especially when uploading from a phone.
Why does my passport scan get rejected if it looks fine to me? Many systems run automated readability checks. If the MRZ is cut off, the text is slightly blurred, or there is glare on the laminate, the system can reject it even if a human could interpret it.
Should I upload PDF or JPG for visa documents? Follow the portal’s instructions exactly. If it accepts both, JPG is often best for single images (passport bio page, photo), while PDF is better for multi-page documents (bank statements, invitation letters).
How do I fix an “encrypted PDF” error? Download an unprotected version from the source, or use a print-to-PDF function to create a new PDF without password protection, then re-upload.
What should I do if the portal says my document is missing after I uploaded it? Confirm you see a filename or preview attached, refresh the page, and make sure you completed the final save/submit step. If possible, switch to a desktop browser for submission.
Need fewer upload errors and faster visa completion?
If you are a travel business looking to reduce document upload friction and support tickets, SimpleVisa helps you integrate guided visa applications into your booking or post-booking flow (via API, white-label app, or data services). Explore SimpleVisa at simplevisa.com and see how a streamlined visa journey can improve completion rates while unlocking ancillary revenue.